
PANO-HEAD
A TRIPOD ATTACHMENT FOR USE WITH SLR CAMERAS
![]()
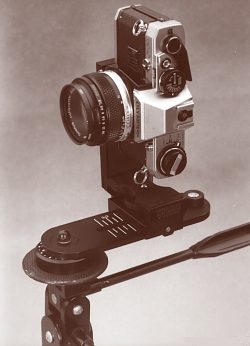
| The Pano-Head, a tripod attachment, is designed
for use with standard SLR cameras to do assemblage type panorama photography
by taking consecutive photos in such a precision manner that the photos
will match up, into one long panorama photo after processing and splicing.
Although the Pano-Head has been designed for use with standard SLR's, it can also be used with other types of cameras, such as Point-and-Shoot, Medium Format and SLRs with Zoom Lenses. Follow the technique described here for the SLR. In some cases an Adapter Plate may be needed to move your mounting hole, so that the Film Plane can be positioned over the appropriate engraved line. The Pano-Head is equipped with a precision
Bubble Level for level panning. The Tilt Bracket allows you to adjust
to the horizon and the Vertical Mounting Bar enables you to use your camera
in the vertical position. The Sliding Block is adjustable for cameras
using 50 mm to 110 mm lenses. The Pano-Head is constructed of solid aluminum
with a black anodized finish and is crafted in the U.S.A. |
$95.00(plus S&H) |
| Technique
Attach the Pano-Head to your tripod. Using the kant levers, or by adjusting the legs on your tripod make the bubble level read level as you sweep around 360. You must always pan level! Mount your camera on the Tilt Bracket for a horizontal pan. To use your camera in the vertical format attach the Vertical Mounting Bar to the side of the Tilt Bracket. Adjust the Sliding Block along the Sweep Bar so that the "Film Plane" or back of the camera is over the engraved line that corresponds to the focal length of the lens you're using.
An easy and less technical and accurate method for correct overlap with any lens is to start from the left of your pan, looking through your viewfinder in the first picture select a prominent point of reference on the RIGHT side of the scene ¼" in from the edge. After taking the shot sweep the camera so that the same point of reference in photo #1 is now ¼" from the edge on the LEFT side of photo #2. Again, pick a prominent point on the RIGHT side of photo #2 and sweep the camera for shot #3 placing the prominent point in photo #2 on the LEFT side of shot #3. Continue this overlap procedure throughout the panorama scene. All horizons are not perfectly straight ahead. You may have to adjust the Tilt Bracket up for tall trees, buildings, rock monuments and down for canyons and city panos taken from hilltops. Tilt the Tilt Bracket and camera as necessary. Once the focus & bracket tilt are set they both have to remain in the same position throughout the pan. After processing, the photos shot "uphill" or "downhill" will arc up or down after splicing. Sometimes this makes for a more dramatic picture after mounting. Splicing details are explained in the "splicing" section of these instructions. As with all photography your lighting is important. Your Panos' will turn out best when your light is even and coming from behind you. Avoid panning near or into the sun, as these photos will wash out after processing and will be difficult to match up with other pictures in the pan. The scenes you photograph with the Pano-Head can be very satisfying when there are only two or three frames in length. The average is six frames - 50 mm horizontal and eight frames - 50 mm vertical. Remember the short format. When you have a prominent object or building
in the pano, plan your spacing and overlap so that the main point of interest
is in the center of a full frame and not in the overlap area. A moving
subject in the center of the frame is OK because your camera will stop
the action. However, moving subjects in the overlap area will not be in
the next photo, after splicing only half the moving subject will be there.
At times moving subjects can work in your favor and be fun to photograph,
such as a boat going through the harbor where the boat is in the center
of each frame and the background matches up into one long pano at the
same time. Other subjects: People jogging, aircraft taking off, people,
children & pets at play. Having them move into each frame would add
to the novelty and interest of the entire pano. |
 |
Splicing Instructions
 Allow
at least ¼ inch, or more, overlap on each picture during the taking
of the panorama scene. After processing, overlap the photos and align by
eye as close as possible, paying attention to the central area. Using Scotch
Transparent Tape, place a small piece at the top and the bottom and a long
piece along the front and back . Using a scale or rule measure the overlap
at the top and put a mark on the tape ½ the amount of the overlap.
Repeat for the bottom overlap. Using a paper cutter or straight edge &
sharp knife, cut through both pictures at the marked points. Remove the
tape and place photos together. Allow
at least ¼ inch, or more, overlap on each picture during the taking
of the panorama scene. After processing, overlap the photos and align by
eye as close as possible, paying attention to the central area. Using Scotch
Transparent Tape, place a small piece at the top and the bottom and a long
piece along the front and back . Using a scale or rule measure the overlap
at the top and put a mark on the tape ½ the amount of the overlap.
Repeat for the bottom overlap. Using a paper cutter or straight edge &
sharp knife, cut through both pictures at the marked points. Remove the
tape and place photos together. |
|
 |
 |
| As an uphill or downhill panorama will have a tendency to arc, the overlap points on the photos will be lesser at the top on down panos and lesser at the bottom on an uphill pano. Be sure there is enough overlap to allow for this condition. Before mounting your photos after splicing, you may want to color the matching edges using "Pentel Color Pens" which will reduce the noticeability of the spliced edge. |
|
 |
Jasper Engineering
Tim Chervenak 1240 A Pear Avenue Mountain View, CA 94043 Phone +1 (650) 967-1578 E-Mail: Jasper31@aol.com |
| Back to the Jasper Engineering Homepage |
|
|
We now accept VISA/MasterCard via PayPal! |

 The
principle here is to pivot the camera on the rear focal node of the lens.
This point would be the same as the focal length of the lens you are using.
Because of the spherical nature of the camera lens there is optical distortion
in each picture. By allowing the photos to overlap and cutting through
both pictures simultaneously this distortion is canceled out and the photos
will then match up end to end and assemble into one long panorama photo.
The
principle here is to pivot the camera on the rear focal node of the lens.
This point would be the same as the focal length of the lens you are using.
Because of the spherical nature of the camera lens there is optical distortion
in each picture. By allowing the photos to overlap and cutting through
both pictures simultaneously this distortion is canceled out and the photos
will then match up end to end and assemble into one long panorama photo.
 Go
through a "dry run" by looking through the viewfinder and count the number
of photos it will take to complete your panorama scene. Be sure there's
enough film in the camera! Allow photos to overlap by at least a ¼
inch / 6 mm in the viewfinder. Using the engraved Dots & Pointer on
the front of the Sweep Bar, select a series of dots that will give you
an equal and sufficient amount of overlap for each picture in the panorama.
The engraved dots, spaced every 30° apart, are to be used as an aid
in spacing whenever suitable to the angle of view of your lens. Every
lens has a different angle of view. The angle of view also changes when
you mount the camera in the vertical position. It's best for you to choose
the spacing that fits your need at the moment.
Go
through a "dry run" by looking through the viewfinder and count the number
of photos it will take to complete your panorama scene. Be sure there's
enough film in the camera! Allow photos to overlap by at least a ¼
inch / 6 mm in the viewfinder. Using the engraved Dots & Pointer on
the front of the Sweep Bar, select a series of dots that will give you
an equal and sufficient amount of overlap for each picture in the panorama.
The engraved dots, spaced every 30° apart, are to be used as an aid
in spacing whenever suitable to the angle of view of your lens. Every
lens has a different angle of view. The angle of view also changes when
you mount the camera in the vertical position. It's best for you to choose
the spacing that fits your need at the moment.