
| A Beginner's Guide to Digital 3D Projection: A Guide for the Not-Too-Technically Inclined by David Starkman - reel3d@aol.com |
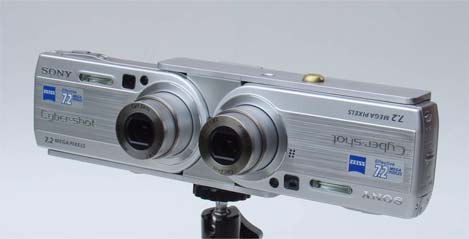
A few years ago, thanks to the electronic and mechanical construction skills of Jacob van Ekeren of The Netherlands, I began taking my first digital 3D photos with a twin Sony P43 rig that he had made. (These are sold in the USA by 3-D Concepts at http://www.make3dimages.com). I am currently using a Sony P200 rig (shown below), also made by Jacob van Ekeren.
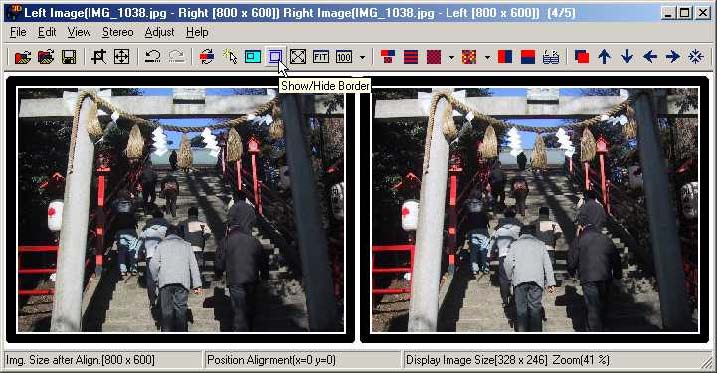
As a result of those two events I wrote "Beginner's Guide" articles on "Getting Started in Digital 3D Photography" and "Using StereoPhoto Maker". In addition, I've had the pleasure of presenting a beginners workshop on SPM at the last two National Stereoscopic Association conventions. Here is a screenshot of SPM: |
 |
One of my goals, ever since Susan Pinsky and I first published "Reel 3-D News" in 1978, has been to share information about everything relating to 3D photography, imaging, presenting, and collecting. A subset of this goal has been to orient this information to beginners, no matter what the topic. If someone can make the information simple enough for ME to understand, then my goal is to put that information in writing to share with others. When it comes to computers, and all of the digital equipment involved in digital 3D imaging, I'm your average end user -- not a computer programmer or electronics wizard.
After about 3 years of shooting digital 3D images, Susan and I had literally thousands of images uploaded into our computers. During the first two years the only way to view those images was to manually align, crop, and save them using SPM. While this was considerably faster than hand mounting slides, it still could be a time consuming job to do 50, 100, 200 or more pairs shot in a busy day of travel shooting. (Yes, much editing needs to be done! One tends to shoot a lot more with digital cameras than with film, as there is no film cost.)
This situation changed about a year ago when SPM added an "Auto Alignment" feature to the program with Version 3.0. One to hundreds of separate Left/Right image pairs may be automatically aligned for window, rotation, and image size, and then saved to any of the output formats. We usually save them as side-by-side pairs, and then view them onscreen with a Pokescope viewer (http://www.pokescope.com). A very small number of images got made into stereo print pairs, and, so far, we haven't made a single pair into slides.
So that brings up the question of what to do with all of these images? The answer presented itself at an NSA convention, not long after getting our first digital camera rig: project them in polarized 3D on a silver screen with a pair of (relatively) low cost DLP projectors.
Digital projectors had been used for 3D as far back as the earliest and bulky 3-lens video projectors. Lower cost single lens LCD projectors were also used, but often required circular polarized glasses due to the polarization used in the LCD panels. A more viable answer for 3D came with the introduction of DLP (Digital Light Projection) projectors. I won't try to explain the technical details of how DLP works (you can find that information online). The bottom line is that the projected image is NOT polarized by the projector. Therefore, simple linear polarizers may be used in the same way that they are used for twin slide projector 3D projection, with a silver screen and 3D glasses.
I have to admit that while I understood the basics, I still could not quite grasp how all of the elements of digital projection came together to get a properly projected 3D image on the silver screen.
My first glimmer of understanding came from Ron Labbe of Studio 3-D (http://www.studio3d.com), who has been a real pioneer in using, promoting, and exhibiting using twin DLP projectors. He's been the main projection "tech guy" for the last few NSA conventions. More importantly, he put a lot of great information about twin digital projection on his web site.
The first thing that Ron made clear for me was how you get a side-by-side stereo pair coming out of two projectors as separate Left/Right images. This is the key to the whole technique.
You may have seen desktop computers that are set up to use two side-by-side monitors (if not, just read along and I'll explain) to get a 2-screen wide desktop. When you move the cursor across the left screen towards the right, and then cross past the right edge of the screen the cursor magically appears at the left edge of the right screen -- as if this were just one big wide screen. This is apparently done by having a low cost (under $100) dual or twin video card, such as the GeoForce, so that two monitors can be running at once, and by changing the electronic screen size to twice as wide as a single screen. (Keep reading. Hopefully this will all fall into place.)
If you had a stereo pair sized to fill up the two screen wide area, then the left image would appear on the left screen, and the right image would appear on the right screen. Make sense? If you now substitute two projectors for two screens, you can see that one just needs to add the polarizers and a silver screen, put on your 3D glasses and you will see a 3D image!
How does one actually DO this?
If you are using a program, such as StereoPhoto Maker, the first step, when an image pair is being aligned, is to save it as a side-by-side pair that is 1024 x 768 pixels in size. There is another step in adding a border or center spacing for cropped images, but that is the subject for a Stereo Photo Maker workshop (e-mail me and I'll be happy to send some basic "Using SPM to align for digital projection" instructions).
You'll need a pair of digital projectors. I can't recommend any particular brand or model. As of this writing my local stereo club (http:// www.la3dclub.com) is planning to do a projection workshop where we will be comparing as many projector rigs as club members will bring. If we come to some conclusions they will be put on the SCSC website. The highest resolution units that will fit your budget is one answer. On the practical side, I suggest an XGA (1024x768) resolution DLP projector. Prices have come way down in the past year, and there are many models under $1,000, and on-sale ones have been listed online in as low as the $500 range. The brightness is usually in the 2,000 to 2,500 lumens range, and you will find that this is incredibly bright compared to our old stereo projectors.
Once I realized this I got on Ebay and managed to get a twin SLIDE projector Chief MSU-200 stand for $68 total. I made a paper template of the bottom of the projectors and used this to place and drill a new hole in each of the two projector platforms to insert a 1/4-20 screw to hold each projector on it's respective platform. Taking a suggestion from SCSC member Eric Kurland, I moved the upper platform down one screw hole, and the bottom platform up one screw hole, so that the projectors are mounted closer together on their respective platforms, for less keystone difference between them. Note, not all digital projectors have a 1/4-20 threaded hole on the bottom. If not, you just set the projectors down on the platforms. |
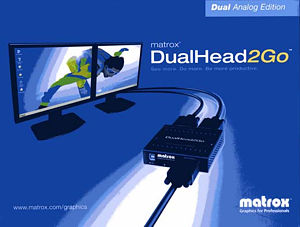
Now your projectors are set up, and are physically ready for 3D projection. How do we connect them to the computer and get an image on the screen? I mentioned before that if you have a desktop computer you will need to have a twin video card installed in your computer. If you have a laptop, some laptops will work with a device made by Matrox called the DualHead2Go. This is basically an electronic box that takes the single video output of the laptop, and splits it into 2 outputs in the same way as the twin video card. Check the Matrox website (http://www.matrox.com) for laptop compatibility. If your laptop is not on the list (ours wasn't) you can download a utility that will check your laptop for Matrox compatibility. The analog version is priced at about $169, the digital version at $229. Check the internet for possible better prices. |
 |
The two video outputs of the Matrox are connected to the two digital projectors in the same way as for a single projector. Software with your video card, or that comes with the Matrox unit, will let you change your screen properties from their normal setting to a 2048 x 768 wide screen (assuming you are using 1024 x 768 projectors). I don't know if this is a standard, but on my setup output 1 is the left side, and output 2 is the right side.
When all of the components (computer or laptop, the two video outputs, plus inputs to the 2 projectors) are connected and turned on you are ready to project through the polarizers onto your silver screen. The instructions suggest making all of the connections before turning on your laptop (if using the Matrox). At this point the Display Properties Settings must be set so that the output (external output for a laptop) is for a 2048 x 768 screen. Most laptops also require that to use one of the FUNCTION keys (Control+F5 on our Toshiba, for example) to change the video output from the laptop screen to the external screen.
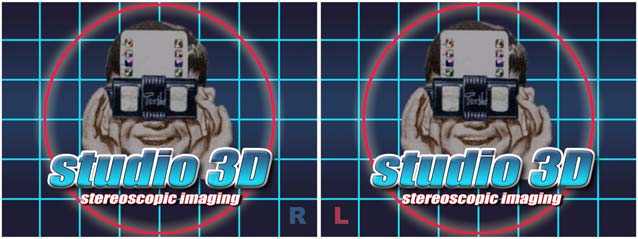
The images coming from the two projectors are then superimposed (overlapped) on the screen. This can be quite confusing if you are projecting your computer "desktop". The left half of what you normally see on the screen will be seen by your left eye, and the right half of what you normally see on the right side of the screen will be seen by your right eye. If you are not simultaneously looking at the desktop on your laptop or desktop monitor, you just have to get used to this temporarily confusing image. Use of the mouse on this superimposed screen takes a little bit of practice, also, but it is possible. I have found that wearing the 3D glasses and closing the appropriate eye makes things a bit less confusing. Ron Labbe has suggested that one way to make the overlapped "confusing desktop" less confusing is to use a desktop background image that is also an alignment tool (see his sample in photo). This might be helpful, however, if your desktop is like mine, most of the icons are on the left side, with almost nothing on the right. Still a bit confusing. I prefer to use a plain light blue background, with no image at all, for the desktop.
Ron also suggested that, while it may be advanced, one could add a third monitor via USB port. This can be small, but it allows one to do all the setups without the audience seeing what you're doing... for the most part, anyway.
At this time projecting a 1024x768 stereo pair target image is a good idea, and absolutely necessary to get the projectors properly aligned. I will be happy to e-mail a copy of the executable Proshow target that I previously mentioned. Just send me an e-mail request.
Alignment is a bit trickier than with slides -- at least it is with the projectors that I am using. These projectors seem to be designed for office boardroom presentations, assuming that the projector will be at normal desk height, not on a high stand. If the projectors are pointed straight ahead, the images actually project upward. Keystoning (where the image appears trapezoidal rather than square) is common. All of the digital projectors seem to have buttons for electronic keystone adjustment. With the target grid I eyeball the right target and adjust the keystoning + or - until it looks square on the screen. I note the number of that keystone setting (-16 for example) and set the left projector to the same number. Then I make a manual adjustment of the left projector one or two clicks up or down to get as close a match as possible. At the same time I am tweaking focus, horizontal, vertical, and zoom size to get the grids as close to 100% superimposed as possible.
Once you have achieved superimposition you are ready to project some stereo pairs. Exit from the target image and here are a couple of possibilities:
Image pairs may be manually shown using StereoPhoto Maker. If everything is set up as just described, open SPM and bring in a stereo pair in side-by-side viewing mode. Then press the ENTER key and the image pair should fill the screen. If the images were not aligned, press Escape, try Autoalign, and try again. Aligned for projection side-by-side pairs also seem to work fine using the "Windows Picture & Fax Viewer" (at least that is what is is called in Windows XP). This had both a single and slide show mode.
If you have brought in a group of aligned and saved pairs into SPM, view the first one as described and then simply press the space bar to go to the next image. This works quite well, and simply, for a manual 3D slide show with twin digital projectors.
The next step would be to make a fade and dissolve slide show with sound. There are many programs to do this. Two of the more popular ones for PC are Proshow Gold and PicturesToExe. This article is not meant to give a lesson in these programs. The main thing is that to create these programs there are three main steps for the 3D image pairs.
First, use SPM to batch rename your pairs and align them as properly windowed stereo pairs.
Second, use SPM to batch align the pairs for projection. In the Multi Conversion dialogue box, in the Edit section click on "Resize" and change the width to 1024 and the height to 768. Then check "keep aspect ratio", and check "border".
(Ron Labbe has said that as far as images being exactly 1024x768, it's not quite necessary. It's good to keep that aspect ratio, but SPM and Proshow Gold with go "FULL SCREEN" no matter what size the original is he can run 1400x1050 ProShow slide shows on his 1024x768 projectors with no problem.)
Third, save these images in an "Aligned4Projection" folder (or a name that makes sense to you) and these are the ones to use with the twin digital projector rig that I have described.
I hope the photos will help make my descriptions more understandable, and that this will help you to get started in doing your own digital projection.
David Starkman, September 2007
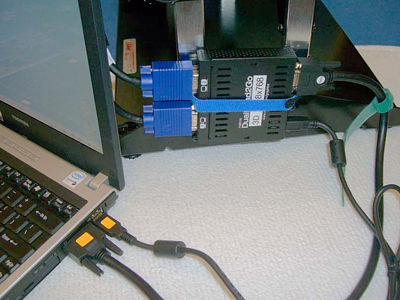
Matrox DualHead2Go strapped to the side of the Chief Stand and plugged into the laptop (cables marked in orange). Cables to the projector have the large blue connectors.
 |
|
|

| Back to the Stereoscopy.com FAQ Page |

 By fortunate coincidence, at that same time, I was introduced to a powerful (yet free!) program for aligning and cropping those 3D images called StereoPhoto Maker (SPM). SPM also makes it easy to save those stereo images in a multiplicity of formats (side-by-side, above/below, anaglyph, for LCD glasses, etc.). (See
  OK. Now, you've got your projectors. While you can theoretically set them side-by-side on a table, stacking the projectors one above the other will reduce keystoning. If you are handy you can make a stand. I began this way, but found that aligning the projectors was very difficult. The elevator feet on these small portable units is not designed for the kind of fine tuning that we want for 3D projection alignment. The simplest solution is to get a commercial twin projector stand, like the Chief brand model that many of us have used for years with twin Carousel slide projectors. I set out to find one of these made for digital projectors and found that they do not seem to exist. Everything that you needed two SLIDE projectors for (such as fade and dissolve), and more, can be done with a single digital projector!
 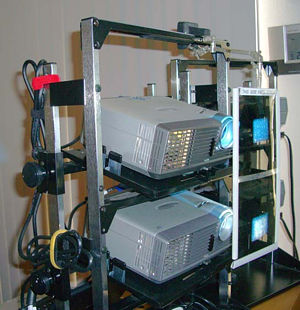 The last step, as far as the physical setup of the projectors, is to put polarizers in front of the projector lenses. I learned very quickly that you will cook (and deform) the polarizers if they are too close to the lenses. 2" to 3" (50mm to 75mm) distance is suggested. Based on an idea from Eric (my local Guru!) I used an alligator clip soldering holder aid, mounted on the top crossbar of the Chief stand, to hold a pair of 6" x 6" polarizers taped together in a single frame made from slip-on report cover clip strips. See the photo of my rig and it will make sense. This keeps the polarizers at a cool distance, and allows enough room for projector adjustments without having to be too critical.