
| Close-up Photography |
Macro 3D Basics
As a general rule, the smaller the object to be photographed in 3D, the more demanding the requirements of the equipment. The basic requirements are as follows:
1. A means of precisely controlling the elevation and angle of the two shots. Normally, you'll want the two shots to be exactly parallel. Compensation for the offset in the two photos is taken care of when you set the stereo window.
2. Precise control of the baseline. Initially, you may get by taking a batch of pictures and picking out the pair that gives the proper depth, but eventually you'll want to be a little more scientific about it. For objects one to several inches across, I like to control spacing to within about a millimeter.
3. Control of the background, for when the object of interest does not take up the entire field of view. With focus at macro distances, distant objects will be badly out of focus. You may also want to allow more depth in your subject by eliminating infinity. I have some pieces of plain cloth of various colors, which I drape behind the subject. If the cloth is far enough back, it is entirely defocused, making a uniform background. If it's close to the subject, it still eliminates infinity
4. Proper lighting is important. In macro stereo photography, it's usually desirable to get the depth of field as great as possible, so you will usually set the aperture very small. To get reasonable exposure times, you therefore need a bright light source. Most people haven't had much luck with incandescent lights - even halogens add a lot of red to the photo (this could probably be corrected by use of the proper filter). Using natural sunlight is best, but has its own problems during the winter or on windy days. If you use a flash, it is important that the flash unit not move relative to the subject between the two photos, because this would cause the shadows in the two images not to match. A fixed mount above or to the side of the camera (with connection to the camera with a flash cable) is ideal.
5. Proper exposure can be very tricky in macro photography. There are formulas that can be used, but it's easiest to use a camera that takes care of it automatically. It works well to use a camera in autoexposure mode. Some camera models take a final exposure reading *after* stopping down, so they can compensate for any inaccuracies in the stopping down process. Some also use TTL (through the lens) flash exposure control, so the duration of the flash is controlled by the illumination on what's in the field of view of the camera - much easier when you can do it. For best results, the distance from the object to the background should be relatively small compared to the distance to the flash. For special lighting situations, keep in mind that macro makes it even harder than usual. For the first two requirements, a regular stereo "slide bar" can be used, especially if the magnification is not very great. Some people have built macro slide bars out of wood.
Base Separation for twin-camera macro photography
The following table suggests the
base separation between the two exposures for correct 3D macro photography:
|
Distance
to Subject
|
Camera
Separation
|
|
30"
|
2.0"
|
|
24"
|
1.6"
|
|
18"
|
1.2"
|
|
12"
|
0.8"
|
|
6"
|
0.4"
|
Keystoning / Convergence Error
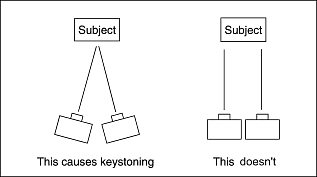
Often someone new to 3D photography feels that, when taking a 3D pair, the camera should "toe-in" towards the subject. This misconception occurs in all 3D photography, but is most pronounced when taking a closeup (macro) shot. It is felt that the camera shots should point in, since that is what the human eye does. The following paragraphs describe the keystoning error which occurs if this is done.
 What
is keystoning (also known as "convergence error")? Consider
what an ideal camera is supposed to do. Take an ideal distortion-free camera.
Mark a grid of evenly spaced lines on a wall and point the camera at the grid
covered wall. Make sure the camera's film plane is parallel to the wall. Take
a picture. Look at the picture and it has a grid on it too. It is a "scale drawing"
of the grid on the wall. You can lay a ruler on the picture and you will find
all the lines are straight. You can use that ruler to measure all the squares
in the grid and you'll find they're all the same size.
What
is keystoning (also known as "convergence error")? Consider
what an ideal camera is supposed to do. Take an ideal distortion-free camera.
Mark a grid of evenly spaced lines on a wall and point the camera at the grid
covered wall. Make sure the camera's film plane is parallel to the wall. Take
a picture. Look at the picture and it has a grid on it too. It is a "scale drawing"
of the grid on the wall. You can lay a ruler on the picture and you will find
all the lines are straight. You can use that ruler to measure all the squares
in the grid and you'll find they're all the same size.
Now tilt the camera's film plane so it's no longer parallel to the grid-covered wall. Take another picture. This time the lines in the picture are still straight, but the squares are no longer all the same size. Also, the squares have become trapezoids or other sorts of quadrangles. These shapes are called "keystones". If you take two pictures as shown in the left illustration, you will get keystoning. The left camera will make a picture with the small ends of the keystones on the right, while the right camera will have make a picture with the small ends of the keystones on the left, like this:
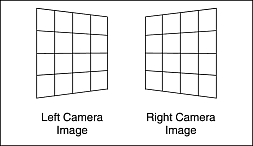
When you go to merge those two pictures in a viewer, you're going to have trouble. The flat wall becomes warped. If the keystoning is severe the pictures will be painful to view if they can be merged at all.
As with a lot of these things, you can get tangled up. The first thing you're going to think is that the left illustration shows how your eyes see things. That's right. But remember your eyes are being presented with an evenly gridded wall in real life so they ought to be presented with the same thing in the viewer.
 |
|
|

| Back to the Stereoscopy.com FAQ Page |
